Step 1.
I like to start my faces off with a circle.Draw a vertical and horizontal line going right through the middle to create a sniper’s scope. This is the foundation of the face viewed from the front.
Step 2.
In this next step we will be adding a few more horizontal lines. The top line represents the hairline. The second line from the top represents the eyebrows. The third from the top represents the nose and the bottom is the chin. As pointed out in the picture the spaces between the 4 horizontal lines are equal in height.
Step 3
Next, we add pockets for the ears by drawing two vertical lines slightly tilted inwards at the bottom.
Step 4.
The eye line is drawn under the halfway mark and it’s on this line that we draw the eyes. Now on this horizontal line you should be able to fit almost 5 eyes in width. So go ahead and pull out your ruler and make sure that there is an eyes width between the other 2 eyes. We’re going to be doing some more measuring so feel free to keep your ruler out.
The nose, amazingly, is just as wide as your eye, generally speaking. So, on the nose line, mark where the nose should be. (The nose line is two thirds of the way down between the half line/eyebrows and the mouth)
And for the mouth draw 2 imaginary lines straight down from the center of each eye; the mouth should stay within those bounds. The mouth sits on the curved line at the bottom of the circle.
Step 5.
Now all you have to do is fill in the features, erase your guidelines and you have a well proportioned face.
Disclaimer: the measurements mentioned above are guidelines and are not necessarily going to fit each face you are drawing. Each face is unique and has it’s own special features but I hope this will come in handy next time you find yourself stuck drawing a face.
This list is for artists who want to start oil painting but aren’t sure of what paint supplies to buy. All of these items can be found at any art supply store, and are absolutely necessary for beginning oil painters.
Make sure you have the right supplies
Canvas
Stretched gessoed canvases are popular . You can also use linen canvasses, which are more expensive, for finer paintings.
You can make your own canvases by buying linen in rolls and gluing them to stiff surfaces like wood panels. Be sure to gesso them before painting on them.
Buy a few different sizes and shapes. Long and thin are great for landscapes.
Easel (You can also lay your canvas flat on a table)
An easel is an upright support used for displaying and/or fixing something resting upon it, at an angle of about 20° to the vertical. In particular easels are traditionally used by painters to support a painting while they work on it, normally standing up, and are also sometimes used to display finished paintings. Artists' easels are still typically made of wood to functional designs that have changed little for centuries, if not millennia, though new materials and designs are now available.
Palette
A palette is used to hold a bit of each paint color squeezed out of the tube, with an area in the center for mixing colors. You need to decide whether you want a palette you hold in your hand or place on a table, and whether it's wooden, white, or transparent (glass). Holding a palette takes a little getting used to, but there's nothing stopping you putting it flat on a tabletop. If you need to clean up completely after each session, a disposable paper palette
Oil Paints
As far as colors go, here’s a list of the must-haves:
Titanium White, Ivory Black, Cadmium Red, Permanent Alizarin Crimson, Ultramarine Blue, Pthalo Blue, Cadmium Yellow Light, and Cadmium Yellow.
Buy each of these colors in 200ml tubes except for Pthalo Blue—Pthalo’s pretty powerful so you probably won’t need as much as you do with the others.
Technically those are all the colors you need, but you should also get a few greens and browns until you learn more about mixing colors. Pick up some Permanent Green Light, Viridian, Burnt Umber, and Burnt Sienna to round out your palette.
Alkyd Quick-Drying Mediums
If you find yourself wishing your oil paint would dry faster, then using alkyd mediums will help. These are compatible with oil paint, and do the same job as oil mediums and solvents, but are formulated to dry much more quickly. Some are formulated as gels or texture paste, to give more body to oil paint.
Different sizes of brushes
It's tempting, but truly you don't need loads of brushes in all the different sizes and shapes. You'll develop a preference for particular sizes and shape, as well as type of hair. To start, I recommend getting just two sizes of filbert brush, with stiff hairs, such as an 8 and 12. A filbert is a versatile brush shape that gives a range of strokes, from wide to narrow,
If you’re an oil painter you know that there are a lot of oil painting brushes available to choose from—big, small, square, angled, and everything in between.
Medium Containers
You'll need a container for whatever medium and/or solvent you're using, and probably another for rinsing your brush clean. An empty jam jar will do the trick, though do remember the issues of solvents and studio ventilation. One option clips onto the edge of your palette and holds a small amount of medium
Palette knife
Solvents for Oil Paints
Paint thinner, turpentine, Turpenoid ,Thinners are used to dilute oil paint and to clean your brushes and palette. The most traditional solvent is turpentine, which maintain the oiliness of oil paint. Adding white or mineral spirits to oil paints makes a watery mixture. Look for low-odor solvents and always use in a well-ventilated room. Solvents sold in hardware stores are not artist's quality and can cause yellowing.
Turpenoid is an odorless form of turpentine, but you still need to make sure your room is well ventilated when using these so-called odorless solvents. Obtain an airtight container for storing your solvents so they do not evaporate.
If you use water soluble oil paints, then regular tap water is your solvent.
Mediums for Oil Paints
Mediums are made to improve the flow of the oil paints and also the transparency and gloss of the final oil painting.reduce drying time, and avoid overthinning. You can buy ready-mixed mediums or use various forms of linseed oil. Read the description on the bottle to see exactly what a medium does. For very thin washes, mix a medium with thinners, otherwise there may not be enough oil to bind the pigment.
Newspaper or Paper Towels
Newspaper is handy to have around when you clean your paint brushes at the end of the day, but it’s also good to use WHILE you’re painting.
Why? Because it’s important to clean your brush every time you start painting a new section or switch colors—and that‘ll happen a lot in every painting.
There’s no need to use turpentine for a full cleaning, just grab some newspaper (cut 4 inch squares ahead of time if you feel like it) and quickly squeeze all the paint out of the bristles. That’ll keep your colors from contaminating each other throughout the painting process.
Towels also can be use for cleaning brushes
Oil paints are extremely versatile. They can be used thickly in impasto or extremely thinly in glazes; they can be opaque or transparent. Here are a few tips to help you get the most from your oils.
Use the best quality of oil paint you can afford. These can be expensive but are well worth it! Start with the primary colors first, and buy a tube of good quality paint whenever you can.
To spare the expensive paint along, use student quality for under-paintings and initial layers.
Tip 1:
Always lay your oil paints out on your palette in the same order so that, with time, you'll be able to pick up a bit of a colour instinctively.
Tip 2:
The proportion of oil medium (not turps thinner) should be increased for each subsequent layer in an oil painting – known as painting 'fat over lean' – because the lower layers absorb oil from the layers on top of them. If the upper layers dry faster than the lower ones, they can crack.
Tip 3:
Avoid using Ivory Black for an underpainting or sketching as it dries much slower than other oil paints.
Tip 4:
Pigments containing lead, cobalt, and manganese accelerate drying. They can be mixed with other colours to speed up drying and are ideal for under layers. (Student-quality paints usually contain cheaper alternatives to these pigments, generally labelled hues.)
Tip 5:
Use linseed oil for an underpainting or in the bottom layers of any oil painting done wet-on-dry as it dries the most thoroughly of all the oils used as mediums.
Tip 6:
Avoid using linseed oil as a medium in whites and blues as it has a marked tendency to yellow, which is most notable with light colours. Poppy oil is recommended for light colours as it has the least tendency to yellow (although it does dry slower).
Tip 7:
Don't dry your oil paintings in the dark. This may cause a thin film of oil to rise to the surface, yellowing it. (This can be removed by exposure to bright daylight.)
Tip 8:
If, as the paint on your palette dries it forms a lot of wrinkles, too much oil (medium) has been added.
Tip 9:
If you're not sure whether a bottle of mineral or white spirits is suitable for oil painting, put a tiny quantity on a piece of paper and let it evaporate. If it evaporates without leaving any residue, stain, or smell, it should be fine.
Tip 10:
If you want to clean away a layer of oil paint or oil varnish, use alcohol, which is a powerful solvent.
Tip 11:
Remember that you can paint with oils without using solvents, using brush pressure to spread the paint out thinly, only oil as a medium and to rinse your brush.
Tip 12:
Don’t use linseed oil when mixing with whites, blues and light colors as it has a yellow hue. Use poppy oil instead when mixing with light colors. Linseed oil is ideal for the under-painting, as it helps the paint dry much faster.
Tip 13:
Use alcohol or turpentine to remove layers when needed. Never use alcohol to clean a dried painting, as it will remove or smudge the paint.
Tip 14:
Never use acrylic on top of oil paint acrylic does not adhere well to oil paint. After a while, the paint will flake or peel.
Tip 15:
Never use pure black many experienced artists will agree. Use dark blues or mixed colors instead, such as phthalo blue mixed with alizarin crimson.
Tip 16:
Cleaner turpentine in the brush jar use a piece of wire mesh or spring that fits in the bottom of your brush jar. This will help clean your brushes, without agitating the residue which sits at the bottom.
Tip 17:
Use brush strokes to enhance a painting brush strokes can bring out forms and emphasize certain areas. As a general rule, use thickly applied paint and texture to highlight parts of a composition.
Tip 18:
Rotate turps and mineral spirits use three jugs, one for the used mineral spirits
(A), one for all the paint residue
(B), and the other for clean mineral spirits
(C). Let the paint settle in jug A, and pour the clean mineral spirits into jug C. Then, pour the residue into jug B. This will help your mineral spirits or turpentine go much further.
Top 19:
Avoid using colors directly from the tube for much of the composition (such as backgrounds). Mix them accordingly. Use pure colors for highlights and things you want to emphasize. This is a personal preference and of course is not a “rule”.
Top 20:
To always keep your palette clean, use wax paper. Wrap it around the palette and tape it in place. Dispose of the wax paper after each use. This is much easier than having to clean a painting palette after each painting session.
Learn painting techniques and how to paint first, then break the rules later. This is a basic rule I learned in art school, and is one I believe all artists should follow.

1)Blocking color.
Block in color with diluted brush strokes by following the outlines of an object. This allows you to define the edges of the object without using the thicker paint. The key is to outline the edges of the object with the same colors that will be used inside of it.
2) Instant background.
You can use a painted background as the base of the painting. Use diluted paint applied in small strokes. Sketch or draw over this base color for an instant background.
3) Transparency.
When showing the transparency of an object in the painting, apply opaque colors over the top of transparent colors.
4) Using layers.
Oil painting allows the artist to completely paint over and completely cover other paint layers as long as they are dry. If you plan on using multiple layers, start out with thinner layers of paint in lighter colors. Slowly make your way toward thicker layers and darker colors.
5) Intensify colors.
Dilute the paint to various stages to create contrast that will intensify the colors. Different densities of the same color can be used to better define the form. When using this technique, leave the background color for last. The diluted surface of the background contrasts with the denser surface of the object.
6) Contrasting colors.
Contrast the colors in your piece to create a three-dimensional feeling.
7) White paint.
In monochromatic subjects you can add volume and relief by emphasizing the white tones. To do this, apply white paint thickly over the base color. Do not over brush the white paint into the object. The brush marks and shades should be easy to see.
8) Chiaroscuro.
Chiaroscuro is one of the oldest oil painting techniques for bringing volume to an object. It focuses on the movement of light across the surface of the object through light and dark contrasting. When using this technique, shadows should be completely black and it is best to use a neutral background color. Learn more about chiaroscuro in famous works with this art history course on Renaissance to 20th century art.
9) Value of brush strokes.
Brush strokes can also define the volume and shape of an object. Use your brush like you would a pencil. Apply different colors of paint like you would with colored pencils.
10) Charcoal lines.
Use charcoal lines behind an object to reinforce it’s shape and give it dimension.
11) Saturated color.
Using saturated color is the most direct way to add form and volume. To use this technique, saturate the color as much as possible in areas of the object that are not illuminated.
12) Brush stroke size.
Different sizes of brush strokes can be used to define and differentiate planes, masses, objects and different areas of the painting. Try experimenting with longer brush strokes, short jabs, and even tiny dots. In general, smaller brush strokes will represent objects closer in the foreground.
13) Paint mixture irregularities.
Add a textual effect to your painting by leaving streaks of color in your paint mixture. These irregularities can add interest to your piece.
14) Foliage.
When painting foliage, your brush strokes can represent leaves. Vary the tones of the leaves by adding more or less diluted paint. Learn more about painting foliage with this plein air (painting outdoors) painting course.
15) Pointillism.
For an Impressionist look to your painting, try using this technique of pointillism. This consists of dabbing small quantities of paint systematically across the entire canvas to achieve a uniform and continuous texture.
16) Informal brush strokes.
Try using informal brush strokes that do not follow a pattern and run in different directions. These strokes should cover the canvas in fluid bunches of color. This technique can be used with both thick and diluted paint.
17) Nonrepresentational brush strokes.
Use a brush stroke free of representational obligations. This means the strokes can go outside of the lines of the object being defined. The strokes will create both the drawing and the color at the same time.
18) Soft texture.
Create a soft feeling in your object with blurred and irregular brush strokes. Try rubbing the brush against the support to get a fluffy texture.
19) Transparent glass.
To suggest the consistency of crystal or transparent glass, keep your paint color pure and add strategic contrast. Add the dark contrasting colors last to suggest the density.
20) Metal.
To create the effect of shiny metal, you must contrast black against white. Paint the darkest areas of the object with diluted black and then apply some diluted white along the black brushstrokes to blend. Apply touches of pure white last to highlight the reflections on the metal.
21) Monochromatic.
Try creating a monochrome painting. Pick a color based on the wide variety of shades it can make. The different intensities of the color will be determined by the dilution of the paint.
22) Cool colors.
Try working with only cool colors like that greens, grays, and blues. Use just a little bit of warm colors to create a counterpoint in the piece.
23) Complementary colors.
The main complementary colors are yellow and violet, blue and orange, and red and green. When these colors are mixed they create gray but when they are next to each other, they create a stark contrast. Consider using complementary colors in your work.
24) Skin.
Human skin does not have a specific color. Artist use combinations and different harmonies of colors to create human flesh. Try using mostly warmer colors with a touch of cool colors to achieve this look.
25) Landscape shadows.
When painting shadows in landscapes, use cool colors like blues, violets, purples, and grays. If you are interested in learning more about oil painting continue your education with a class on oil painting techniques and color theory.

In order to paint well, you need to draw well.What you need to draw these projects and demos is simple. Some oil pastels, maybe a pencil or some erasable colored pencils, a kneaded eraser and a sketchpad or sketchbook with a lot of pages.
I prefer wire bound sketchbooks 9" x 12" or smaller because they fit on my scanner and lay flat. My favorites are the spiral bound hard cover ones that even need a drawing board. They're inexpensive online, especially if you watch for sale coupons
Line
Line is the most basic drawing skill you'll ever have. Accurate outlines are what you need to draw under any kind of painting.
Proportion Judging the proportions of anything by eye is tricky and takes a lot of practice, but once you have drawn the same thing many times it gets a lot easier to understand its proportions. Draw your favorite things over and over.
Gesture Drawing
Fast one to five minute sketches will improve your observation and drawing skills more than you expect. Also linked under Creativity as a daily art exercise anyone can do.
Contour Drawing
A more advanced treatment of line that follows the shapes of shadows as well as objects.
Shading
You can shade a drawing many different ways. Gradual shading is an important skill for realism. Shading establishes the depth of objects and makes them look three dimensional.
Perspective
Whether you're drawing trees and mountains in a landscape, buildings on a city street or two cans on a tray right in front of you, perspective is how to make things look three dimensional and real. Good linear perspective gives depth to the whole painting.
Notan
A Japanese concept and technique that's become popular with many Western artists as a way to make your art more powerful, more dramatic and expressive, with better composition.
Color Theory Color theory, identifying colors and how they behave next to each other is a way to get true color -- or exciting color that comes out better than life.
Composition
How to decide the shape and size of your picture, and where to place its focal point using the Rule of Three. Why it's good to crop photos or move the objects in them to suit yourself.
Tools for Drawing with Charcoal
When using charcoal to draw, a few tools will need to be at your disposal. First, you may need a variety of different types of charcoal- vine, compressed, pencil form.
You will also want to have a kneaded eraser
Paper
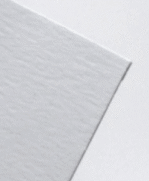
Choose a white, thicker paper with a slight texture. If it's too smooth the charcoal wont stick to the paper. If it's too textured you'll have a hard time drawing details. The texture on paper pictured below is just right! It came from a Strathmore 300 Series Bristol Board Vellum Pad. Some watercolor and printmaking papers are also excellent choices (for example: Rives BFK white). Avoid cream or colored papers. If it's your first time buying art paper I recommend visiting an art store in person so that you may feel and compare a wide variety of papers.
Grainy paper is preferred because of the variety of textures you can achieve. Again bockinford is the preferred paper
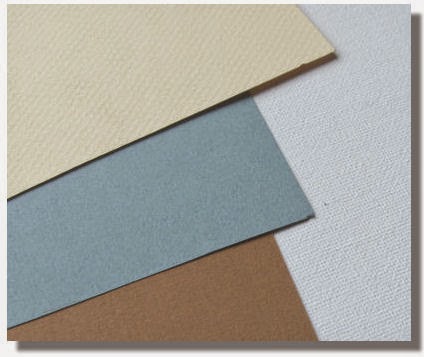
try different makes to best suit your needs. You don't have to draw on normal white paper, you can also use coloured paper like grey or blue, the colour of brown wrapping paper is also good to draw on with charcoal and on the reverse side is a little grainy which is good for texture
Vine Charcoal
(also called Willow charcoal) This is uncompressed charcoal that's easy to erase.
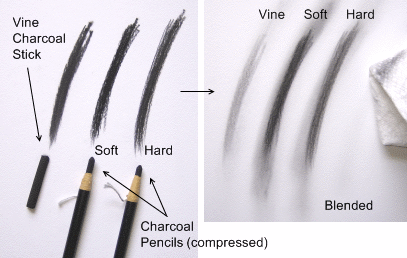
Vine charcoal is easily spread on a surface and is very easy to erase. As a consequence it is generally makes a lighter mark when you draw than compressed charcoal and easily smudges. (Which may be a benefit.)
Compressed Charcoal
(pencil or stick) Comes in soft, medium and hard - just like graphite, soft is darker and hard is lighter!
Compressed charcoal is held together by a gum binder and is darker than vine charcoal. As a result, it is harder to erase, harder to smudge, but makes a darker mark. Compressed charcoal may come as a round stick, a square stick, or in a pencil. (Vine charcoal is almost always a round stick.) Some compressed charcoal is pigmented. This is the case with white compressed charcoal.
Kneaded Eraser
Soft, pliable gray eraser that you can
squeeze into any shape (good for creating subtle gradations).A kneaded eraser is a special type of eraser that is designed to lift the material off of the surface. Kneaded erasers work especially well with charcoal.
Gum and/or white erasers
Harder erasers (good for erasing the most charcoal to reveal white highlights).
Blending stump (also called tortillon)
Good for blending smaller detail areas.You may also want to have a blending stump. A blending stump will allow you to have full control over the blending and smearing of the charcoal. You can create a blending stump by tightly rolling up drawing paper to a point.
If you are drawing on a flat surface, it's also a good idea to have a paper towel handy. You can lay the paper towel between your hand and the surface of the drawing, so that your hand doesn't smear your work.
Paper towels
Good for blending large areas and "erasing" vine charcoal sketches.
Spray Fixative (Optional)
Spray fix helps to protect a drawing once it's finished by preventing smearing. It "fixes" or sets the media onto the paper. Because charcoal drawings are often very dusty, this is a common practice. There are different types of fixative.
There is workable fixative which allows for some work to done on the artwork after it has been "fixed". There is also final fixative, which is used when the drawing is finished. Most artists, like myself, chose to only use workable fixative, since you may chose to go back to drawing and work on it at a later time.
Fixative comes in a spray can and is applied by spraying it onto the artwork. The best way to do this is in a well-ventilated area with the spray can held about a foot away from the artwork. Hairspray can be used in place of fixative but it can darken the surface so it is not recommended
Charcoal characteristics:
Vine charcoal erases easily - Start out with vine charcoal, erasing mistakes as you go.
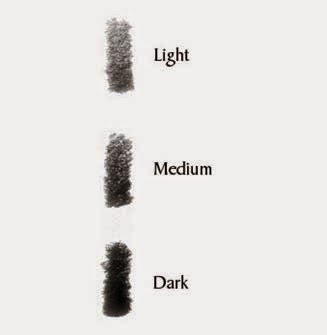
Compressed charcoal has more staying power - Once you have a good vine charcoal sketch, move on to your compressed charcoal pencils. Just like with graphite pencils, start out with your harder(ligher) charcoal and end with the softer(darker) charcoal pencils.
Charcoal Pencils
Charcoal pencils give you more control and are best for adding detail.
This is denser and oilier stuff owing to a higher degree of graphite, producing beautiful darks that are a whole lot more difficult to remove when you goof in your charcoal drawing. It doesn't blend nearly as well as vine, either. These qualities make it leave more permanent traces in your drawing.
High Contrast vs. Low Contrast:
Charcoal has the ability to go rich dark black. Give your drawing more pop and drama by including areas of white, various shades of gray, as well as areas of black in your composition. Low contrast drawings tend to look unfinished - avoid low contrast compositions unless subtlety is what you are going for.
Tips for Holding The Charcoal
Vine charcoal and compressed sticks should be held differently in your hand than a drawing pencil. It will vary from artist to artist, but my suggestion is to hold the charcoal with your thumb and forefinger with your palm facing the surface of the paper.
This allows you to make marks using your shoulder and elbow instead of with just your wrist.


